Puppeteerでファイルのアップロード
Puppeteerで業務自動化はこれまで6個ほど現場向けにアプリケーションを作り現在本格稼働しています。割とシンプルな構造なので、この仕組を横展開する事で高額で応用の効かないRPA製品を使わずともウェブアプリケーション全盛の時代では、Puppeteerで自動化が簡単に実現可能です。
さて、今回そういった業務用アプリで頻繁に使うシーンの1つとして、指定のサイト上でファイルをアップロードする作業があります。これを今回Puppeteerで実現してみます。今回はログイン不要でネットプリントを利用できるセブンイレブンのネットプリントを利用してみようと思います。
目次
今回使用するライブラリ等
デスクトップに作成済みのuploadフォルダ内にあるjpgファイルをアップロードするのが今回の仕組みになりますので、予めデスクトップにuploadフォルダを作り、jpgファイルを格納しておいてください。但しネットプリントの使用により最大5個まで。
今回のアップロード上の問題点
今回利用するセブンイレブンのネットプリント。自宅にプリンタが無い人が利用するのに非常に便利なサービスで、それなりにコストは掛かるものの、買って無駄にしがちなプリンタを所有しなくて良いのは大きな利点なのと、出先であってもプリント出来る大きなメリットがあります。
しかし、その仕様により制限もあるので、Puppeteerで作り込む場合には注意が必要。今回は写真を登録(フォト用紙にプリント)するので、通常のドキュメント(WordやPDF)のパターンではありませんが、基本は同じ流れになります。
- ユーザID登録がなくてもインスタントに利用できる(24時間後に自動的に削除される)
- 暗証番号と通知用のメアド登録を今回は利用します。
- Puppeteer Recorderを使って作ろうとすると、余計なエレメント操作がかなり多数記録されてしまうので、必要な部分だけを取り出す必要がある。
- jpg画像でなければNG。また最大5個までしか登録が出来ません。トータルのファイルサイズ制限もあるので要注意。
- 画像の縦横サイズの最小サイズ規制もあるので、小さいサイズの画像ファイルだと印刷出来ません。
- Puppeteerはまだ「ドラッグアンドドロップ」に対応していない
- アップロード後すぐに登録番号が出るわけじゃないので、ブラウザは閉じないほうが親切。メアド通知は来ますが。
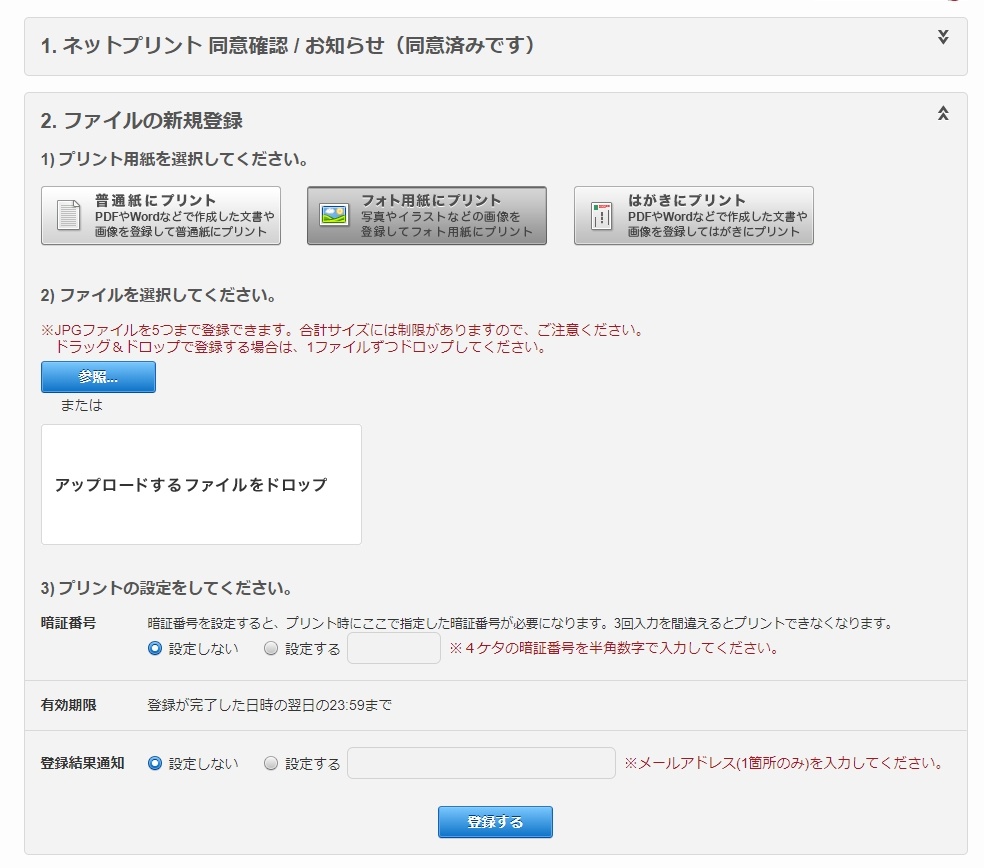
図:色々とお世話になったサービスです
ソースコード
冒頭部分
//使用するモジュール
const puppeteer = require('puppeteer-core');
var fs = require('fs');
const path = require("path");
var shell = require('child_process').exec;
var spawnSync = require('child_process').spawnSync;
const prompts = require("prompts");

//デスクトップのパスを取得
var dir_home = process.env[process.platform == "win32" ? "USERPROFILE" : "HOME"];
var deskpath = require("path").join(dir_home, "Desktop");

//アップロード元フォルダの指定
var dir_desktop = deskpath + "\\upload\\";

//オープンするURL
var url = "https://lite.printing.ne.jp/web/";

//Chromeのパスを取得(ユーザ権限インストール時)
const userHome = process.env[process.platform == "win32" ? "USERPROFILE" : "HOME"];
var kiteipath = "C:\\Program Files (x86)\\Google\\Chrome\\Application\\chrome.exe";
var temppath = path.join(userHome, "AppData\\Local\\Google\\Chrome\\Application\\chrome.exe");

//chrome場所判定
if(fs.existsSync(kiteipath)){
  var chromepath = kiteipath
  console.log("プログラムフォルダにChromeみつかったよ");
}else{
  if(fs.existsSync(temppath)){
    var chromepath = temppath;
    console.log("ユーザディレクトリにChrome見つかったよ");
  }else{
    console.log("chromeのインストールが必要です。");
    //IEを起動してChromeのインストールを促す
    shell('start "" "iexplore" "https://www.google.co.jp/chrome/"')
    return;
  }
}

//プロンプト表示
getprompt();
- グローバル変数でデスクトップのパスを取得しておきます。
- つづけて、getprompt()を実行してユーザの入力を受付待ちします。
- chromeはいつもの「C:\\Program Files (x86)\\Google\\Chrome\\Application\\chrome.exe」ではなく、「C:\\Users\\ユーザー名\\AppData\\Local\\Google\\Chrome\\Application\\chrome.exe」となるため、ユーザ毎のパスを取得して、chromepathに格納する
プロンプト入力受付部分
//プロンプトを表示
async function getprompt(){
  // 入力を待ち受ける内容
  let question = [
    {
      type: "number",
      name: "angou",
      message: "4桁の暗証番号を登録してください(例:2015)"
    },
    {
      type: 'text',
      name: "mail",
      message: "通知先メアドを登録してください(例:tomato@kinoko.org)"
    },
  ];

  // promptsの起動
  let response =  await prompts(question);

  //回答を取得
  var angou = String(response.angou);
  var mail = String(response.mail);

  //メイン関数を呼び出す
  await main(angou,mail);
}
- 暗証番号は4桁の数値である必要があるので、numberで型付けしています。
- メアドと暗証番号を受け取ってmain関数に引き渡します。
Puppeteer部分
//ブラウザ操作メイン関数
async function main(angou,mail) {
    const browser = await puppeteer.launch({
      headless: false,
      executablePath: chromepath,
      ignoreDefaultArgs: ["--guest",'--disable-extensions','--start-fullscreen','--incognito',],
      slowMo:100,
    });

   //pageを定義
    const page = await browser.newPage()
    const navigationPromise = page.waitForNavigation()

    //ログインページを開く
    await page.goto(url)
    await page.setViewport({ width: 1200, height: 900 })
    await navigationPromise

    //同意確認をチェックしてボタンをクリック
    await page.waitForSelector('form > #agreement-area > #agreement-section > .xux-verticalLayout-top > .xux-labelableBox-content')
    await page.click('form > #agreement-area > #agreement-section > .xux-verticalLayout-top > .xux-labelableBox-content')
    await page.waitForSelector('.xux-labelableBox-content > .txt-align-cnter > .xux-labelableBox-content > .something-else-semantic > .xux-choice-bg')
    await page.click('.xux-labelableBox-content > .txt-align-cnter > .xux-labelableBox-content > .something-else-semantic > .xux-choice-bg')
    await page.waitForSelector('.txt-align-cnter > .xux-labelableBox-content > .xux-button > #start-sevice-button > .xux-button-text')
    await page.click('.txt-align-cnter > .xux-labelableBox-content > .xux-button > #start-sevice-button > .xux-button-text')

    //フォト用紙にプリントをクリック
    await page.waitForSelector('#select-size-section > .mb4 > .xux-labelableBox-content > #create-image > img')
    await page.click('#select-size-section > .mb4 > .xux-labelableBox-content > #create-image > img')

    //フォルダ内のファイルを配列に登録する(最大五個)
    var cnt = 1;     //個数判定用カウンタ
    var inputarr = [];

    await fs.readdir(dir_desktop, function(err, files){
        if (err) throw err;
        files.filter(function(file){
          //ファイルのフルパスを生成
          var fileman = dir_desktop + file;

          //jpgファイルかどうかでフィルタする
          return fs.statSync(fileman).isFile() && /.*\.jpg$/.test(fileman);
        }).forEach(function (file) {
          //個数判定
          if(cnt > 5) {
            //5個より上は無視する
          }else{
            //ファイルパスを取得する
            var filepath = dir_desktop + file;

            //配列にpushする
            inputarr.push(filepath);
          }
        });
    });

    //inputarr登録までの待機の為のスリープ
    await sleep(2000)

    cnt = 1
    for(var i = 0;i<inputarr.length;i++){
      //対象エレメントIDを生成する
      var inputele = "#file-image" + cnt;

      //エレメントを取得する
      var inputman = await page.$(inputele);

      //inputに送りつける
      await inputman.uploadFile(inputarr[i]);

      //カウンタを加算
      cnt = cnt + 1;
    }

    //暗証番号とメアドを入力
    await page.waitForSelector('#image-register-section > .xux-mixableBox > .xux-labelableBox-content > .ui-button:nth-child(6) > .xux-choice-bg')
    await page.click('#image-register-section > .xux-mixableBox > .xux-labelableBox-content > .ui-button:nth-child(6) > .xux-choice-bg')
    await page.waitForSelector('#registration-area > #image-register-section #image-secretNumber')
    await page.click('#registration-area > #image-register-section #image-secretNumber')
    await page.type('#registration-area > #image-register-section #image-secretNumber', angou)

    await page.waitForSelector('#image-register-section > .xux-mixableBox:nth-child(21) > .xux-labelableBox-content > .ui-button:nth-child(4) > .xux-choice-bg')
    await page.click('#image-register-section > .xux-mixableBox:nth-child(21) > .xux-labelableBox-content > .ui-button:nth-child(4) > .xux-choice-bg')
    await page.waitForSelector('#image-register-section #image-mailAddress')
    await page.click('#image-register-section #image-mailAddress')
    await page.type('#image-register-section #image-mailAddress', mail)

    //登録ボタンをクリックする
    await page.waitForSelector('.txt-align-cnter > .xux-labelableBox-content > .xux-button > #submit-image-button > .xux-button-text')
    await page.click('.txt-align-cnter > .xux-labelableBox-content > .xux-button > #submit-image-button > .xux-button-text')

    //終了メッセージを表示
    const script = `window.alert('処理が完了しました')`;
    await page.addScriptTag({ content: script });

    //ブラウザを閉じる
    //await browser.close()

}
- HTML解析してみた所、ファイルアップ用のinputが5個用意されていたので、直接ファイルパスを流し込んであげる必要がある(それぞれのinputはIDを持ってる)
- フォルダ内の画像一覧を配列に入れた後にスリープを入れないと非同期にループまで実行されてしまうので、2000msのスリープを間に入れてあります。
- 1個ずつ各file-imageのIDを持つinputに対して画像のフルパスを格納してあげます。uploadFileメソッドでinputに対して登録します。
- 最大5個まで。ソレ以上のファイルは配列に登録しません。
- 登録ボタンクリック後はブラウザを閉じずにそのままにしています。メアド通知を入れているので、閉じてしまっても問題はないかと思いますが。
単一実行ファイルを作成する
Node.js 18よりSingle executable applicationsという機能が装備され、標準で単独実行ファイルが作成できるようになりました。結果pkgはプロジェクト終了となっています。よって、以下のエントリーの単一実行ファイルを作成するを参考に、Node18以降はexeファイルを作成することが可能です。
関連リンク
- JavaScriptプログラミング講座 – ファイルをアップロードする
- Handling multiple files from an input element in an array with Google Apps Script
- FileList – Web API Interfaces MDN
- HTML5のFile APIでローカルファイル情報取得してやんよ!!!
- puppeteer でフォームからファイルのアップロード
- node.js ファイル一覧を取得する
- Why doesn't Puppeteer work with multiple uploads?
- テレビ番組への観覧応募をpuppeteerで自動化する